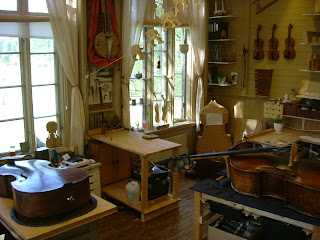
Welcome to the virtual incarnation of my workshop where you can find out about the different aspects of my work - without disturbing me. My website http://www.basscare.se/ is being kept as simple as possible. Here is where you'll find the stuff I chat to my customers about, or stuff that I would chat to my customers about if there was more time and I was more chatty. Feel free to browse around and if you'd like to get updates in your facebook newsfeed click on 'like' at my facebook page: Elinore Morris - instrument maker www.facebook.com/Basscare. The colours of this blog attempt to match the colours of the inside of the workshop, which has been renovated with historically accurate linseed oil based paint, and you can see a snippet of the newly sanded wooden floor.

Monday 9 May 2016

Removable Double Bass Neck

Travel bass conversion


Bass players who frequently travel long distances face many challenges. If you are lucky, you'll have an experienced orchestra management behind you to take care of the logistics; you arrive at rehearsal and your own bass is waiting for you requiring nothing more than a little extra tuning. Travelling independently to gigs is a whole other story. Can you afford that extra seat? Or should you use a hard flight case? Sure this will keep the bass safe but then there's organising special transport to and from the airport. Hiring or borrowing an instrument is another option but what a lottery that can be. 

For many players the best compromise is a collapsible travel bass that can go in the hold as a normal piece of luggage. There are a number of these available and some very clever designs. Which alternative works best for the player is a very individual thing. However, sometimes you have a bass that may not be especially valuable, but it works really well for you, it's easily playable, has a good and reliable sound and you just like playing it much more than any of the folding basses that you've tried. Converting such a bass into a travel instrument may then be an option worth looking into.

I recently did such an operation. Neck repairs, especially when the the foot of the neck has cracked always present a challenge. The amount of pressure from the strings is enormous. When I need to replace a neck I will saw it off and then chip out the wood from the joint rather than risk damage when forcing it out. In this case I first removed the fingerboard and then sawed the neck at an acute angle near the button and then along the bottom, where the neck meets the body. Two problems arise from this. Firstly some wood is always lost when sawing so that needs to be replaced. Secondly the now much thinner neck foot is vulnerable to cracking along the vertical grain lines. The way I rectified this was to line the foot with ebony which solved both these issues but also presented the possibility of creating a mortise joint which would ensure accurate placement  of the neck.


Making a snugly fitting joint here worked fine, but it made actually removing and replacing the neck tricky. So a compromise had to be made. I wanted the joint to glide in and out easily but then also to be very firm once in place. My aim was for the neck to feel as solid as it was before the operation only because of the strength and accuracy of the joint and not by relying on pressure from the strings. This so that the instrument can be moved around and worked on without strings as easily as an instrument with a solid neck. I eased the tightness of the mortise joint and lubricated the surfaces with graphite (pencil lead). This now meant that while the neck moved nice and easily, once it was in place there was a slight side to side movement in the joint. I was able to eliminate this by fitting a piece of ebony snugly underneath the bottom of the neck.


Finally a single bolt holds the neck in place.


Thursday 21 June 2012

New Workshop

Midsummer 2012 - I have just moved my workshop to another room in the same building...

and managed to get it organised and set up in time for the summer work rush...

Am very pleased with the results, though it is a little sad to say goodbye to my old,  now empty work space.

Wednesday 25 April 2012

Hemslöjdslövet - the Home Craft Leaf

This year they are celebrating 100 years of Hemslöjd, the special kind of Swedish craft work that is much a part of the culture here. There will be an exhibition this summer of 2 000 of these leaves made by people from all over the country, mounted on 100 trees at Liljevalchs art gallery in Stockholm. You can read more about it here: http://hemslojden100ar.se/utstallningar/liljevalchs/

The idea was that the leaves shall show something personal and meaningful from each creator. I've had a little look at some of the other contributions and there is an amazing amount of variety and creativity. Yesterday I finished my leaf and handed it in to the craft consultants who work in the same building. They were finishing up with a big meeting and asked me to talk to everyone there about the ideas behind my leaf. When I was finished they said they wished they had recorded it, hmmm, I said - well I'll have to write it down then. So I did. Here are pictures and the little descriptive text I made, its a kind of poem, in Swedish.

 Ursprungslövet,
Människans ursprung.
I Afrikas livmodern har vi alla legat.

Titta här på Afrikas vattenflod,
Och glöm inte de underjordiska floder,
Andliga förbindelser med de gamla, de heliga.

Från Afrika har vi dragits ut i världen,
Genom forntidens utvandring, genom porten utan återvändo,
(Även jag har följt med i Zimbabwes stora folk utvandring på 2000-talet.)

Men kopplingen finns kvar.
Vi känna den, vi dras tillbaka
Till vår ursprung.

54 länder ska det vara,
Har vi härute bestämt,
För nu ska vi minsann ta vårt arv.

Dessa diamanter med guld omkring -
Hur mycket kostar de?
I dollar,  i kronor, i människoblod?


Men lyssnar nu till musiken,
Till Jazz och Rock and Roll och Hip-hops rytmer
Som sträcker sig över landet som en bro mellan världens alla människor.

För nu vill vi återvända, nu vill vi, nu kan vi
gir tillbaka, och läka sår … tillsammans…
Och med nytt hopp i människans vagga  väcker återigen nytt liv.

                           
The plywood has many layers, it has depth. The wood represents Africa’s flora. The copper plate probably comes from Zambia originally and it symbolizes the earth, Africa’s mineral riches.  Copper was used as currency there in the past. In some traditions metal used in a musical instrument also symbolizes magic. The front is made from goat skin from Senegal, which stands for Africa’s animal life. Round the edge are blood diamonds and gold. The strings are left over from when I made a Kora (west African stringed instrument), and are attached with violin pegs. The tail piece is made from an old fingerboard, African ebony, you can still see the marks from the strings from when it was played. The bridge is cut from a double bass bridge that I made for an instrument in the Gothenburg Symphony Orchestra, and later replaced.
                             
 The pictures don't show the details so well, one needs to have a closer look. The front has a map of Africa with its waters. In the poem I said don't forget the underground rivers, the spiritual connections to the ancestors and the holy places. Around the edge I scratched in the names of the 54 countries, an external concept, borders drawn out by the colonists. The cord, a closed circle, weaving in and out holds everything together. It represents the outward movement of people from Africa during the mankind's early development, during the slave trade and now the great Zimbabwean exodus of which I am a part. It also represents the movement of european/ arab slave traders, the colonists and the multinational companies. It is as if at some level they remember where they originally came from and they return to demand their inheritance, to take Africa's riches. This is what the edgework represents - diamond shapes, surrounded by gold, filled with blood. Over the hide, strings are stretched. It is like music creates a bridge over the continent between all the people of the world, the rhythms of  jazz, blues, rock and roll, hip hop etc, which came originally from Africa and have spread over the world joining people together. Now we can see the positive, the millions of Africans in the diaspora who pour back wealth to their countries and their families who remained behind. There are also millions of others who feel this inexplicable pull, who feel drawn to Africa and drawn to help and heal. So the flow is back and forth. On the back, on the copper, there is the form of a foetus, made with sandpaper. It represents the idea of Africa as the womb of mankind, we all come from there originally. It also represents new life, new hope, Renaissance. And the way in which the metal reflects the light through the skin, Africa's Enlightenment.

Thursday 16 February 2012

What I really do


What society thinks that I do:


What my violinmaker colleagues think that I do:


What I want my customers to think that I can do:


What the Tax Department thinks that I do:


What I really do? 


Try and clean Pops rosin off double basses. 


Wednesday 18 January 2012

Fitting necks and bridges on a double bass

Many violin makers prefer not to work with double basses. Often they don't have the space, or the right tools. They might not feel confident about working with such a big instrument, they might not particularly like double basses, or know much about them. Perhaps some, remembering all those jokes in violin making school about double bass work and carpentry, might even feel themselves a bit of a failure were they to let a double bass come into their ateljé. Such hit and miss woodwork hardly demands the kind of precision or deep knowledge of the art form that violin making does. Or does it?

A typical task for a violin making practical exam is to fit a neck on a violin using a dove tail joint. This is not easy as one is working in three dimensions and there is only a single point, lying at the intersection of four different planes, that is correct. Inching your way along here is not the right word, more like millimetering your way, no micrometering woodshaving by woodshaving towards this correct point, all the time making the four important checks. Firstly, when you look down on the instrument from the top, the line that runs through the ears of the scroll needs to run parallel with the line that you can see between the ribs and the table. Then, looking down over the fingerboard you  need to make sure that it lies exactly down the middle, which you do by comparing distances from the f-holes. In fact for this check, you need to really look at the instrument from all angles, even from the back. Next, the angle of elevation. The angle of the foot should be 87 degrees and this should mean that at the foot of the neck, the fingerboard lies 6mm on each side above the purfling on the table and the end of the fingerboard should lie 21 mm above the table. This should correspond to a standard bridge height of 33mm. Finally the neck should be sufficiently sunk into the joint so that the distance along the fingerboard between the edge of the table and the top saddle, or nut, is 13mm long. Phew, what could be harder than that?

Fitting a double bass neck, of course. Here there are no standard measurements, so you have to first work out which measurements you are going to need, in relation to the body form. Important things that need consideration here include the symmetry of the instrument, especially around the f holes; the depth of the ribs and how round the upper bout is (a very round form will need a neck set further away from the body for the instument to be playable in the higher positions, but only if the ribs are not to deep); the thickness of the table, how flexible and how strong it is (if the table is thin and weak the neck angle should be less steep in order to reduce the pressure on it from the strings) and finally the proportions of the body length to the neck length. If this is wrong the instrument will be unplayable. The crook in the neck needs to be exactly opposite D on the G string, or sometimes Eb depending on the preference of the player. This is not something you need to worry about so much on a violin, but is very important on a bass. The other important difference of course is that the pressure from the strings on a bass is absolutely enormous which makes a perfect fitting at the neck joint all the more crucial.

So now we have dealt with some of the issues of neck fittings I´ll move on to a little case study on a bass bridge I did a little while ago that demonstrates the relation between setting of the neck and the carving of the bridge. One could think of the bridge as being in a way an extension of the neck/fingerboard. The instrument in question came in in two pieces, neck and body, and the instructions "this bass was about to go on the rubbish tip, see if you can do something with it, maybe you can use it for spare parts." I said I don't know about spare parts but if it can't be resurrected I'll use the table for a sign post and the back and ribs I will fit with shelves and hang on the wall. So much for my fun ideas, on closer inspection I realised that it would be quite possible to glue the open seams, refit the neck and set it up to a perfectly respectable student bass. So that is what I did.

Now let me show you the outlines of the old bridge and the new bridge and explain the differences.

Here is the original bridge. If you look along the bottom, you can see that the table was misformed, being higher on the treble side than on the bass side. The right (bass) foot is lower than the left, if you compare to the rather faint line that shows the level. This is pretty common, and can be exacerbated by having a sound post that is fitted too tightly, pushing up that side of the instrument. When this does happen, it is important to take this into consideration and compensate by making that leg of the bridge longer. On this bridge they haven't thought of that and the two legs are the same length, both 65mm. The result being that the whole top of the bridge is shifted to one side. Compare the solid line with the perpendicular dotted line. This results in the strings not being centered over the fingerboard, but shifted over to the bass side, making it impossible to play. So when that happens the simplest solution, as they did in this case, is to move the bottom of the bridge over to the treble side and then the strings lie in the right place. This is not ideal because now the pressure on the area between the f-holes is uneven, and the vibrations may not be properly activating the bass bar (which lies underneath the bass foot).

But there is another problem here and that is the relative height of the bridge on the bass side compared to the treble, 64mm compared with 53mm. The bass strings need to be a bit higher because they are thicker and vibrate more widely and may buzz against the fingerboard if they are too low. But if they are too high in relation to the treble strings then a player may have to work harder to get their arm around the instrument to bow on the top string. It is better if the top of the bridge has a flatter profile. The best way of countering this problem is by resetting the neck (obviously not always possible, sometimes a wedge under the fingerboard will do) so that the length of the fingerboard is tilted slightly over to the bass side.

The bridge height of 173mm was also quite high considering that the neck and the bottom saddle were originally set quite low to the instrument, suggesting high tension by the strings on the bridge. As a general rule of thumb, I like my bridges to be more or less as high as they are wide. So when I reset the neck, as well as angling it slightly, I also added a new piece of wood to the end of the neck foot so that the fingerboard didn't lie so close to the table. Then I set it at less of an angle so the height of the bridge wasn't as high.

So here is the final result. The table is still deformed (correcting that would entail a full plaster cast mould and reshaping, the cost of which would exceed the value of the instrument) but that doesn't matter anymore because I have adjusted the respective lengths of the feet so that the bridge stands properly upright, the centre line is perpendicular. The upper measurements are now 49mm to 46mm which is as it should be. The height now a perfectly respectable 160mm with the heart nicely centered in the middle. And the firewood that was destined for the container is now being played by a deserving student.
So, when you need to have your bass set up, and your local violin repair person will not accept it, don't take it to the nearest carpenter, or let your uncle or friend loose on it.... Ok, real bass repairers are not easy to find, so you can give it to your uncle or friend if you really want to..... but, first make sure they read and understand this and then see if they are they are still up to the challenge.

Monday 29 August 2011

Spirit Varnish for Violins

Today I mixed some new varnish, Apothecary style on a real old balance scale, with the traditional resins and gums. On the left scale you can see benzoe and mastix and on the right, sandarac. I'd already measured the shellac into the large glass jar which is flanked by gum elemi on the left and venetian turpentine. Behind is a 5l container of spirits, 99.7% ethanol to be exact.


Benzoe: is a balsamic resin which comes from one of several species of Styrax trees. It has the most wonderful smell, which is why I like to use it. So not surprsingly it is also used to make incense, and as a fixative in perfumery.

Mastix: comes from the sap of the tree pistacia lentiscus. As well as being one of the finer resins to use for violin varnish it is used as a culinary spice in Greece and Turkey, especially for sweets and desserts and is also a kind of natural chewing gum. Probably the best thing is to pick the resin drops straight off the tree, if you're going to use it as chewing gum, because I find that it tends to crumble in the mouth and then stick stickily on the teeth, but it has a lovely flavour and apparently soothes the stomach, absorbs cholesterol and reduces bacterial plaque (by 41,5% according to one study).

Sandarac: is a resin from North African tetraclinis articulata. It is one of the most important ingredients in varnish but also used as incense, a remedy for diarrhea, and calligraphers like to grind it up and sprinkle it on their parchments.

Shellac: is a resin which doesn't come directly from a tree, but via the alimentary canal of the female lac bug kerria lacca. The rather pale shellac that I use (there are many different colours) probably comes from the tree schleichera trijuga. It's fairly common knowledge that shellac is used as a varnish and as an ingredient in a french polish, but it is also known as food additive number E904 and used to replace the natural wax removed from apples during the cleaning process! It is also a low temperature fuel which allows for the creation of pures greens and blues in fireworks.

Gum elemi: This is a fragrant sticky mess which comes from the tree canarium luzonicum. It can been used to treat coughs and brochitis and in Arabic it means "as above, so below" suggesting that it works on the emotional and spiritual planes as well.

Venetian turpentine: is a variety of turpentine that comes from the Western Larch or larix occidentalis. Ordinary modern turpentine is a horrid stinky liquid used for cleaning brushes and things, but it has traditionally been used in medicine to treat wounds, lice and intestinal parasites and is still used as an ingredient in Vicks chest rub.


Very pretty when the jar is filled with alcohol and put in the window, though not for long as they all start to mix and dissolve and murkify. I'll stir it now and then and when I'm happy, filter it through an unbleached coffee filter to remove the insoluble bits.

So you want to know the secret of my varnish? The secret is that there is no secret. It's my own concoction based largely on what we used at school and I'm quite happy with the way it works. Here is the recipe:

  4 parts sandarac
  2 parts shellac
  1 part benzoe
  1 part mastix
  1 blob gum elemi
  1 blob venetian turpentine

Monday 22 August 2011

Raising the saddle on a double bass to lessen the string angle.


A problem that you sometimes get with basses is that the angle of the strings at the bridge is too acute. This is idiosyncratic to the way the instrument, in particular the neck setting, has been constructed. The steeper the angle of the strings at the bridge, the more downwards pressure is exerted on the table. This can affect the tone and may result in a bigger, brighter sound which could be desirable, but it can also cause problems if the table is old, thin and/or pressure sensitive. One may also be looking for a warmer, more open response for orchestra playing.

The solution to this problem, if it is a problem, is to raise the height of the bottom saddle. There are a variety of ways to do this and many players are now looking for an adjustable saddle raiser which allows them flexibilty, for them to have more control over the instrument's sound. I have just had a bass in for that job and came up with the solution pictured above. I am quite pleased with the result: a simple, what they might call here in Sweden "funkis", design. It is made from an old piece of fingerboard, fitted exactly to the existing saddle, which has two invisible screws holding it in place. It sits loosely and may easily be removed should the player wish to return to the original setting. The pressure from the string tension here is quite enormous which means careful attention to the fitting and form of the saddle is essential. The laws of physics and mechanics (vectors) must be taken into consideration. The tailwire is made of a very strong, non-elastic cord, tied with a simple knot which can also be easily adjusted. This will be necessary when switching between the different saddles. 

Here you can see the adjusted string angles which sit nicely and evenly over the bridge.